Soliders Can’t Dance

6 03 2013

Flash – a-ah – saviour of the universe.
Here’s part one of my weekends shootings. More to come soon.

.

Click to see larger

This week Soldiers Can’t Dance were treated to the Deadl.ie treatment and were the first in line to scoop up a free shoot. The shoot took place in an abandoned building in the city that was as scary as it was amazing. With thin corrugated iron crumbling beneath our feet, pigeons taking flight and shaking the walls in the process, not to mention the eerie discarded children’s toys littered about the place, the building is one that after this weekend, I’ve probably seen enough of.

The band arrived as I’d hoped. Stylish, on time and up for a good explore of the place. The building was huge so after a good 30 minute search of the place, we’d found our locations. First up the ‘X’ wall (picture 1). A flat wall, with one light pointing at it, with a smoke bomb between the guys and myself and a light above the smoke and the band was how the shot was set up.

As I couldn’t have the light directly above me – given I was shooting quite zoomed in, and the assistant would’ve been visible in the shot, I had the light come from the left. This gives a small fall-off in the light come the right side of the image, but nothing I don’t find acceptable.

The second shot was in the main body of the building. It was full of thick, thick dust, pigeon shit and oddly, rolls of film. There was a large walkway that led down the building about 9 feet above the ground. I raced down this and placed a light at the first crossing of walkways,  point back directly towards the camera and a smokebomb in between the two. The flash behind the smoke was set to full power to really blow out the background, and as the light was slightly tipped up, it also gave a slight fill to the dungeon-like background.

The smoke bombs run for above 30 seconds outdoors normally. Given the dark conditions in ‘the cave’ and the lack of wind, they ran about twice as long. Even after this, they hung around in some sense for a while. Initially they looked too thick, but after a few moments it became manageable. Unfortunately – I missed a few ideal conditions of the smoke given my flash recycling time, but overall I’m happy.

This time I was closer to the band, shooting wide, so I could have my assistant behind me lighting the scene evenly. You can really see the difference. It’s much more even and it’s my personal favourite of the shoot.

I deliberately left Luke (in the orange shirt) to either side of the shot. The guys were all wearing dark colours initially (Luke had a leather jacktet) but I needed to make them stand out slightly. We ditched the jacket and I felt it too obvious to put the only guy in black in the middle.

So there y’are now. Any questions, just ask. I’d be more than happy to help.

Big thanks to Aaron Corr and Aisling Finn for assisting on the shoot!


The Power of the Edit

24 02 2013

Avast matey. Yer back perusing my lovely drivel and coloured rectangles, I see. Today I’m showing off the importance of a little brushing up to your images. Or in this case, a good brush up.

Right so, one thing I always notice that new photographers tend to forget is the importance of the edit. So many go to all the effort of getting the lighting spot on, the model looking spectacular and then they upload the very basic file from the camera. I’ll say it now – every photo needs some sort of photo-manipulation. There’s no difference between editing a photograph in a darkroom, or in a bright room at a computer. Except maybe the speed. Oh and cost. I can’t stand photo-manipulation snobs. You don’t get un-produced tracks on great albums, why put your name to unedited images?

I’ve been known to do the very least amount required in my early work, but I find I enjoy editing as much as the actual shoot these days. People go mental when other photographers say ‘I can fix it in the edit’, but to be perfectly honest I sometimes shoot with the post-process in mind.

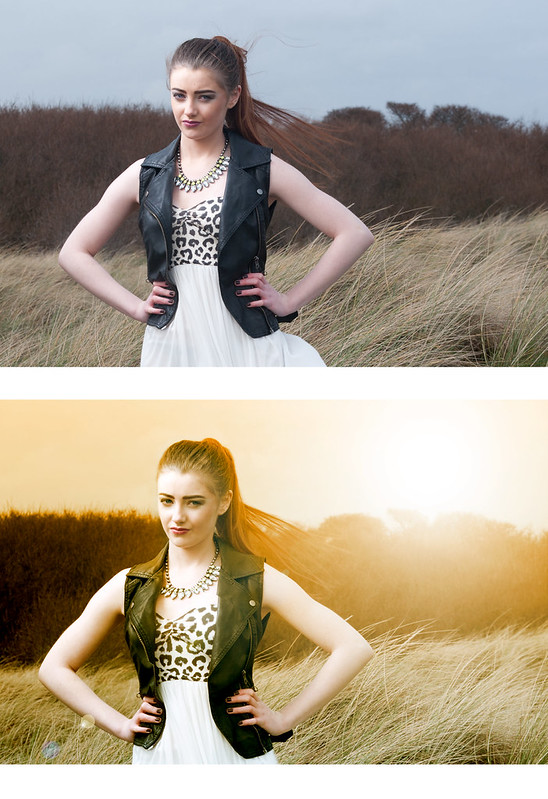
For example, the recent DollyFrocks shoot is for their summer line. I forgot that with the initial edit, mind you, but I went back and put about 40 minutes into this one:

I changed almost everything – the colour of the sky, the models hair, the manke-up tones – the whole shebang. Truth be told, these are things I couldn’t have controlled. The hair was victim to the wind, the make up was slightly flat and as hard as I tried, the sky refused to go golden at 2pm. I probably could have done the whole thing in less than 40 minutes, but there was a semi-interesting Liam Nesson film on in the background.

Anyway, here’s a before and after.

Having seen them like this (I’ve never put the before and after beside each other before) I think I’ll start keeping a record of my best ones.
While this one might be a tad overcooked, I really like it, so screw you. If anyone wants the process, just leave a comment and I’ll point you in the right direction.


DollyFrocks

12 02 2013

Here’s a shoot I had with DollyFrocks last weekend. Before I dive back into music photography, I gave one last go to something outside my comfort zone. Fashion confuses me, but photography I can do. With stylists on board, I’m free to shoot the way I like without having to worry about things I know little about (clothes, to be specific. I’m a jeans and tee shirt kinda guy). We headed to Bull Island and avoided the crowds by heading off the beaten track. It was pretty chilly and exposed (not to mention all the dog doo we had to avoid), but it made for some cool backgrounds.

I’d planned to head to the long grass there, and use the Anne Liebowitz ‘Rhianna’ shoot as my basis for the shoot. Unfortunately the weather didn’t break as well as I’d planned and the sky was pretty overcast, but I think I got something acceptable.

All shots were shot with two lights, excluding the ambient light.
I exposed for the background first as always, introduced my first light, then based on the ambient light reading. With a shutter speed of 1/200 and an aperture of f/14 (ISO always at 200 for shoots like this), I brought in the large softbox first. I wanted to get close with the softbox, to retain lots of softness. This was great as I needed the flash at 1/2 at about 4 feet away for most shots. I added a rim light too. To be perfectly honest I’m not that specific with my rim lights. If it defines my model and isn’t massively over-exposed, I’m not going to tweak it too much.


I brought some smoke bombs with me, but as they burn for about 30 seconds max, you really have little room for flash misfires, model blinks, dropped poses etc. I’m sure I’ve one, but none presentable at present. In the meantime hopefully these are pleasing to your eye. I’ve a few more ideas for shoots later on in the year, but for now, I think I’ll concentrate on bands.

Models: Chelsea Byrne, Jade Stapleton & Paul Lyons 
MUA: Julia Babahina 
Style: DollyFrocks Clothing, Dublin 
Assistant: Yan Bourke


Free photoshoots for Unsigned Bands

5 02 2013


As some of you avid Deadl.ie readers may know, I offer free photoshoots to unsigned Dublin bands. Not always or to anyone, mind you, but to those bands who catch my eyes and ears. If I take a shine to a band – I want to take their photograph. The Cast of Cheers, No Monster Club, Alarmist, Dott, Nella Dwyer, Friend?, P/I/G/S, Tuner, EatenByBears and more have all benefitted from this project of mine and your band could now too.

So if you’re interested in having your photos taken by the most handsome man in the country on the wrong side of the camera – leave a link to your music in the comments below and if I likes what I hear, I’ll be in contact.

P/I/G/S

You might ask, what’s in it for me as a photographer? Fair cop, but it’s simple – I don’t make any money off these images unless you’re any good. I will retain copyright information to the images, but you can use them on social networking sites. You can stick them on your Facebook, Twitter, MySpace (it’s back, y’know) and band website, but if they are being sent into the press you have to let them know that I own copyright. I get paid when they get published in any major publication. That way you get high quality images published and I get paid. Win-win.

Now go out there good fellows and spread the word – the Deadl.ie photographer just got deadlier.


Alf, The National Print Museum

17 01 2013

Late last year I was asked by the lovely folk at TotallyDublin to go to the National Print Museum and take some photographs of the people and machinery there. I didn’t know we had a National Print Museum at all and I just presumed it was in some place that it really wasn’t. Thankfully I’m *always* early for stuff like this, so when I got word it wasn’t anything to do with the Book of Kells in Trinity (honestly, even I don’t know how I got that impression), a quick taxi-ride took me over to it. Alf (the man above) was being interviewed when I arrived.

Left to my own devices, I plodded around the place, taking some shots of the machinery and setting up my portraits, by placing light stands here and there. The machinery was baffling, but thankfully after his interview Alf came down and talked us through every machine there. Every one. It could’ve been a real bore, but when you meet someone with a real passion for something like Alf, it’s easy to get sucked into his stories. I learned about Slugs and bleeding and how you could lose and arm or tone up your arse muscles in an old printing factory. Better still I learned how to spot a fake Declaration of Irish Independence (It’s the c’s, they didn’t have any in the font they started to use, so they’re all in a calligraphy-type script – Oh, and the large letter P in ‘republic’ is just an R with a lump taken off it.)

So there y’are. That’s the background to this, but I was asked by a few people how I got this shot, so I’ll do a little run through it.

Strobist Info: 

Right, so the image is composed with two light sources in a cross-lighting pattern (Have the lights facing each other and the model between them). First off I took an ambient light reading. It was exceptionally dark in this part of the gallery. I needed a narrow aperture to get detail in everything around Alf, so I settled on f/11 after a few shots (I normally start at f/8 and wiggle from there). 1/50 @ ISO 2000 (yup, thousand) was where I was otherwise. I needed to get some background detail in here and as I didn’t have a tripod with me, I had to limit the shutter speed to 1/50 as my lowest possible factor. Thankfully the D700 can handle this kind of ISO tom-foolery, so 2000 was acceptable at the time.

Right, so next I brought in my background light (the one flaring to the right of the frame). I placed it behind Alfie at an angle that’d light the back of his head and also the work space around him. It did a good job. Although it may be somewhat over-exposed on the white area in the back, it had to be somewhat to pick out the details in the keyboard below that. As you can imagine, given the settings mentioned earlier, the flash was at a relatively low setting (1/8 for the background if I remember correctly). I had it at it’s widest point, so as to illuminate as much as it could in the scene around him.

With that all looking fine-and-dandy I introduced my second light – a small softbox held above and to the left of Alf (facing the other light, essentially) by one of the helpful staff members there. As far as I can remember it was about 1/16, but I’m open to argument. The softbox has seen better days, but it still gives lovely light. If you click the image there you can see it large on Flickr. I just love the fall-off from it.

There y’are now. Not a perfect solution to this scene, but one that I came to first whilst working on my feet. If I was to change anything, I’d go back, open up that aperture, knock the background really out of focus, blur everything up to the keyboard by his side and adjust correspondingly with the flashlights.